Showing posts with label aqua. Show all posts

Sunday, September 15, 2013

Week Forty-Three: Kite

This week's project is simple and hopefully inspiring, while also being bright and cheery.


It's a nice little message that I hope inspires people to be courageous.


The clouds were created with loose swirls layered over the top of each other.


I went with bright and cheery colours for a simply designed kite with a nice long tail and a silver thread tethered somewhere far below.


Next week I've got something else that soars through the air...
 
 
xnata.

Sunday, August 25, 2013

Week Forty: Puddle-Wonderful

Only one day late, I'm catching up!

This week's post is inspired by the quote included, using words from a poem called 'Just In' by E.E. Cummings, and frequently paraphrased thusly: "The world is mud-luscious and puddle-wonderful".


We have a little kid under a big umbrella, walking through the rain and enjoying the puddles.


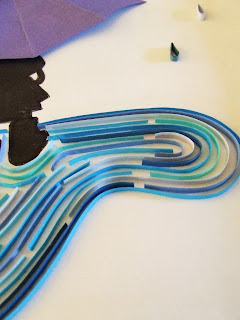
This technique for water was a bit of a practice for me, for a big special piece involving water that I will be working on as soon as I've ordered a lot more of these shades of blue...


It's a good reminder to try and see things from a positive perspective as much as you can, and enjoy the little pleasures in life.


Okay, so that's cute, and it was good fun to make. This week's project will be up as soon as I can fit it in to my annoyingly full schedule.

xnata.

Monday, July 29, 2013

Week Thirty-Seven: Quilled Initials

Last week I made something in the popular Pinterest trend known as ombre, and this week I've made something in another pinterest trend's style: chevron!


Many people like to have their child's name or initial done up in an artistic piece for their bedroom wall, or maybe the family's surname initial to add to a beautiful wall of family photos.


I love this faux-vintage frame.


I went for a minty-aqua colour for this piece, I think with the white it's a very fresh sort of look.

 
Next week's piece is already done, and I've decided it's my favourite so far! I read the quote somewhere and the image came to me right away, and I just had to make it while it was fresh in my mind! So excited for you to see it, but I'll hold off for next week when it's actually due.

xnata

Monday, July 15, 2013

Week Thirty-Five: Butterfly Nursery Mobile

This week I have attempted something a bit different, and I gave a clue a week or two ago on the Facebook page, and I must say I'm quite chuffed with the end product, it is gloriously sweet.


A Rainbow of pretty husked flutterbies for little babies to watch as they fall asleep!


The fantastic thing about these husked butterflies for this purpose is that they are so light and seem to catch the teeniest tiniest breeze, so it's basically constantly moving, which is perfect for the little bubby watching, it's quite mesmerising and so happy and bright.


I've used the classic husking technique as displayed in Week 7, in various sizes and all the basic colours of the rainbow.


The frame is made of the inside ring of embroidery hoops of two sizes, and I've painted them with a pearlescent white paint, then it's all put together with white embroidery thread, nice and thick to hold up the rings but one strand thick for the pretty butterflies. I've sealed the knots with fabric glue to avoid it unravelling, and I've sprayed the butterflies with 'preserve it' to avoid colour fading and make them a little tougher. And it's all held up by a simple silver ring.

I've seen ways to make the structure to attach it to a crib, but as it's so delicate I would suggest hanging it from a hook in the ceiling would be much better, and you can add string to the ring to have it lower down without it ending up within reach of your little munchkin/s as even a baby would crush these within seconds.

Here's a shot of what the little ones will see...

It was hard to pick a photo of this nursery mobile, as the breeze changed it so often that each picture was different in a lovely way. Getting this to hang evenly was the hardest part of this project I must say, it took a few tries and lots of wasted thread, but now I've got the hang of it I am sure I won't have so much trouble in the future.


So, that was lovely wasn't it? Makes you wish there were more real live butterflies around. We should do something about that. Having said that I found one in my kitchen last week, perhaps she saw these others and knew we were butterfly-friendly. Anyway, next week we're going to see something really purple!


xnata

Tuesday, July 9, 2013

Week Thirty-Four: Blowin' Bubbles

This week we are getting into my framed pieces, there will be several of those in the next few weeks (apart from next week, which will be a whole other story) we get a reminder to enjoy the simple things in our lives. It keeps you young.

 *Before we continue, I have announced the winner of the mask or frame competition, the winner's name is up on the Facebook page - the winner chose the frame, so the mask is now available for purchase! I'll be mounting it to a stick, and it will be $18 + postage*


This design is fairly simple in terms of the quilling, bubbles don't take much to look good, but what is great about them is the impact of lots and lots of them! I've got them gradually increasing in size on this one.


I think he looks a little like Christopher Robin, don't you? I think it's that scruffy head of hair.


H. Jackson Brown has some fantastic quotes, I'll be doing others with his wisdom involved, all taken from a book I own that he wrote called 'Life's little instruction book'. It was written for his son, so I think it's quite fitting that we've got a boy involved in this piece.


The bubbles are in all the colours you might see in the surface of a real bubble.


We've got lots more framed pieces coming up in the next couple of months, all to end up for sale along with masks and other items on my madeit page (currently under construction, will put up a link when it's up and going again).


Next week though we're not doing something framed or a mask or a card! It's something very special and beautiful, for which I've left a photo clue on the Facebook page...

xnata

Monday, May 20, 2013

Week Twenty-Seven: Two!

This week my son will be turning two years old, so this week's project was to make two two cards!


One is blue and green and probably suited to a boy, but I didn't want to show a bias and ignore all the beautiful two year old girls out there, so the second is pink and purple.


To make these numbers I printed off a flipped number two, and used the husking technique again, but with some modifications. I used dress pins instead of berry pins, so that the heads of the pins wouldn't get in the way...


I loved the simple design of this balloon card. I once the balloons where in place I decided to just add a layer of crimped blue paper inside the two, and then it just looked perfect to me.


 I love it. It just makes me smile.

 
I almost made the girl's one the same design as the boy's one, but I wanted a bit more variety so I went full on girly with it.

 
Ruffles and polka dots...

Pink crimped rainbow, a flower and a love heart. Could it be girlier? I don't think so. I love the bright colours of both.

Next week we're moving reluctantly on from the theme that is my wonderful boy and all things baby, and celebrate the changing of seasons!

xnata

Thursday, February 21, 2013

Week Fourteen: Blog Header

I was looking over my blog last week, and it occured to me that my blog header is a drawing. And I mainly quill on here. Something doesn't make sense there...

So I quilled it!

Well...I quilled what it is in my head, which is apparently slightly wrong, but it's close enough that I'm sure as heck not going to start over. We'll call it artistic expression and move on.

I haven't put it up as the header yet (the thought of trying to fiddle with it to make it fit the space is not one that takes me to a happy place), but here are several photos of it for you to enjoy.

The finished product!


I might tweak  the colouring before I put it up also, to work with the background (I didn't have just the right shades at my disposal - though I will add that the turquoise edge is a shade of scrapbooking paper called 'rain', which amused me and I had to find some way to include it).

Now, one last thing. It's about to get pretty quiet around here. I start back at uni next week, and due to some confusion between me, the program coordinator and a lecturer, I'm doing 3 courses instead of only two, so I'm going to be crazy busy. I'll still be posting weekly, but don't be surprised if there are very few words to some posts.

xnata

Thursday, August 30, 2012

Beach Christmas - Paper Ornaments

*If you have been directed here from my Facebook link blunder, click here to see the Christmas Wreath.

Yesterday I took the afternoon off from university to spend some time crafting, and I'm really happy with some of what came out of the day.

We'll start with my favourite:

keeping with my colour scheme, we've got the aqua/teal colour in the pinwheel at the back, with some flowers made of napkins (sticking to my attempt to avoid buying very much for these ornaments!), and a quilled circle centre. You can't really see the glitter but the pinwheel is edged with glitter glue and then the quilled centre is coated in glitter also.

A paper ornament honouring the land of the language I love so much, we have a Paris doily ornament, hung with ribbon.

Now this skinny number is made with a tassle I removed from another purchase that it just didn't suit (in my opinion). I made some little quilled beads, and added a little doily (current squished up against the cabinet there, but it won't sit like that on the tree), and a ribbon up top. I change between loving this and thinking it's bin-worthy. We'll see what happens.

I've already got about four other quilled snowflakes that I made a long time ago, but now I've got these two as well:


Loving the stripey peach paper I used for the first one. So bright and fresh.

I haven't made the rest of my burlap/hessian and lace placemats yet, but there'll be time for that in the near future, I'm sure, and I'll post photos of them when I have.


Have a lovely day,

xnata

Friday, July 20, 2012

Pinterest - Pearl and Ribbon Bracelet

I may have been the last woman on the planet to join pinterest.

Okay, that's an exaggeration I know plenty of ladies that aren't on pinterest, and to you I say: hold out as long as you can - it's addictive as hell and lands you doing projects that have nothing to do with anything you should be doing. Except maybe dinner.

I've been on it for like a week and already I've pinned like two hundred things, made baby-friendly (ie edible) poster paint, a chicken dinner that put some sort of magic spell on me with its deliciousness, and made this bracelet. What next??

The bracelet had a link that I attempted to follow and it seemed to lead nowhere, so I typed in the link shown on the picture and I still didn't find it, but going by the website I'd say there were no written instructions there anyway. So I made it up.

Here is the link to the original pinterest pin, in case anyone wants to accuse me of not giving due credit: http://pinterest.com/pin/257197828690118892/

My bead shop is so awesome I nearly bought enough glass pearls to make like ten of these, but then I caught myself and scaled it back to a healthy two or three. So only like double what I intended to buy. And this is why I don't go there very often.


As you can see I didn't go for the cream and navy look, it's lovely but not really me. I found these cool pale aqua pearls with a pinky shine to them, and found and old bit of pink ribbon in my ribbon box, and voila!


You'll have to excuse the ridiculous nails, I just see so many cool nail designs on pinterest that I felt like joining in, in the most pathetic and non artistic way possible. But they're pretty colours and some how I have had them un-chipped for over 24 hours, which in my world is a small miracle. But this gives you an idea of the size of the bracelet.


The only complication with this bracelet is the fact that you need to tie a bow to do it up, and I managed to do that, but it'd probably look better if you could con someone else to tie it up for you. I suppose you could forego this issue by making it have a normal, easy clasp, but I really liked the whole pretty bow thing. Too cute.

The other beads I've bought are lovely, some of them handpainted (by NOT ME, someone much cleverer than me), and if that one turns out well I'll sneak back to show you that one too. And if anyone needs instructions beyond looking at the pinterest thing and my pictures, just ask and I'll do a 'how to' post as well.

:D

xnata.